Migrating a website is one of those things that sounds straightforward until you’re knee-deep in broken links, tanked rankings, and pages that have vanished from Google overnight.
Fun times.
Whether you’re switching hosting providers, moving to a new domain, replatforming from WordPress to something else (or onto WordPress), or doing a full site redesign… a website migration touches everything. Your URLs, your content, your SEO, your site structure. All of it.
The good news?
With a solid plan, you can make changes to your site without losing the rankings and traffic you’ve worked hard to build.
That’s exactly what this website migration checklist is for – and our migration checklist builder!
We’ve broken the entire migration process into clear, actionable steps so you can move your site with confidence.
Let’s get into it.
TLDR
Website migration doesn’t have to be a nightmare… but it will be if you wing it.
Back up everything first.
Crawl your existing site so you know what you’re working with.
Map every single redirect (no, not just the important ones… all of them).
Set up a staging environment.
Check your on-page SEO hasn’t gone walkabout during the move.
Submit a fresh sitemap.
Then monitor everything like a hawk for the first month post-launch.
The short version? Plan it properly, redirect it completely, and test it obsessively. That’s 90% of a successful migration right there.
What Is a Website Migration?
Before we jump into the checklist, let’s get the basics sorted.
A website migration is any significant change to your site that can impact how search engines crawl, index, and rank your pages. That includes things like:
Moving to a new domain (e.g. oldbusiness.com.au to newbrand.com.au). Switching hosting providers or servers. Replatforming (say, from Squarespace to WordPress). A full site redesign with new URLs and page structure. Moving from HTTP to HTTPS. Or even merging multiple sites into one.
Each of these changes carries SEO risk. Google needs to re-crawl and re-index your new site, and if it can’t find or understand your pages properly… your rankings take a hit.
PRO TIP: Not all migrations are equal. A simple hosting change with no URL changes is far lower risk than a full domain migration with a new site structure. Understand which type of migration you’re doing, because that determines how much SEO work is involved.
Build Your Custom Migration Checklist
Every migration is different. Moving hosting providers? That’s a very different job to a full domain change with a site redesign thrown in.
So we built something to help.
Our free Website Migration Checklist Generator lets you select exactly what type of migration you’re doing, and it builds a step-by-step checklist tailored to your situation. No fluff. No irrelevant steps. Just the tasks you actually need to complete, in the right order.
Whether you’re replatforming to WordPress, switching domains, merging two sites into one, or just upgrading your hosting… select what applies, and the tool does the rest.
Website Migration Checklist
Answer a few questions to generate a checklist tailored to your migration.
Select all that apply
Migration Complete!
You've checked off every item. Keep monitoring for the next 30 – 90 days.
Your Migration Progress
Pre-Migration: Get Your House in Order
This is where 90% of migration success is decided. Skip the planning and you’ll be firefighting for months.
1. Back Up Everything
This one’s non-negotiable. Before you touch anything, take a complete backup of your website. That means your database, files, media, plugins, themes… the lot. If something goes sideways during migration, this backup is your safety net.
If you’re on WordPress, tools like UpdraftPlus or All-in-One WP Migration make this pretty painless. For other platforms, check with your hosting provider or development team.
EXPERT TIP: Store your backup somewhere separate from your current hosting environment. If the server goes down during migration, you don’t want your backup sitting on the same server.
2. Crawl and Audit Your Existing Site
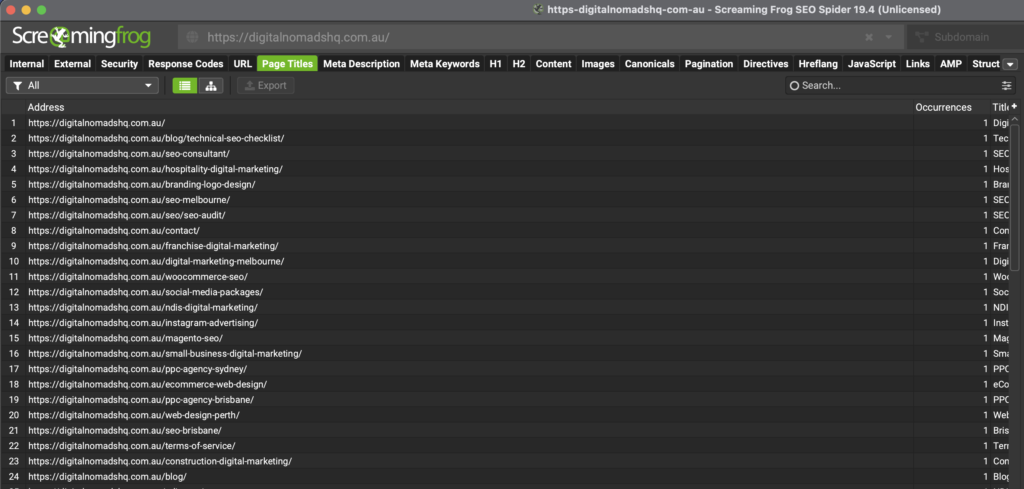
You can’t migrate what you don’t understand. Run a full crawl of your current site using a tool like Screaming Frog, Sitebulb, or Semrush’s Site Audit.
What you’re looking for:
A complete list of all URLs (pages, posts, images, PDFs… everything currently indexed). Any existing broken links, redirect chains, or crawl errors. Your current site structure and internal linking patterns. Pages that are already performing well in search engines (you really don’t want to lose these).
This crawl data becomes your migration map. It tells you exactly which pages need redirects, which URLs are changing, and where the SEO value lives on your current site.
3. Plan Your Redirects (Yes, All of Them)
If your URLs are changing, you need a 301 redirect plan. Every. Single. Page.
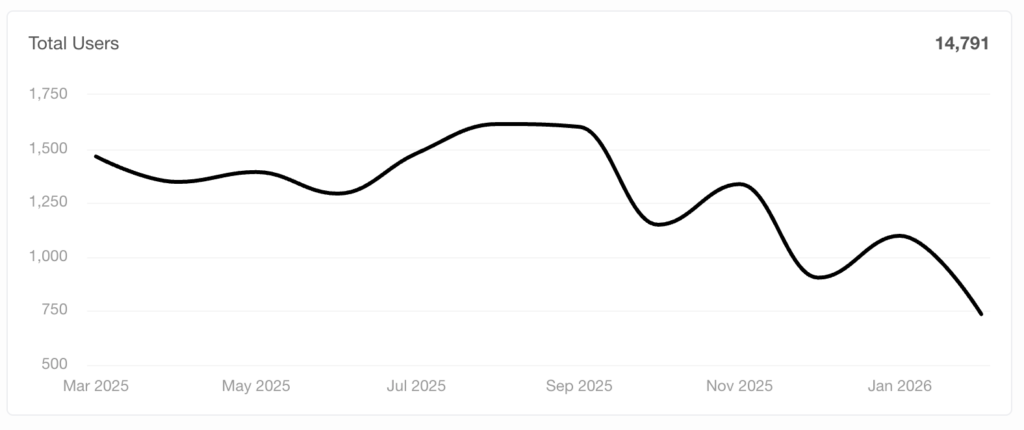
We have seen too many websites get redeveloped with the lack of urgency and planning on page redirects. One company I recently assessed lost 60% of their organic traffic in the first 6 months of their new website going live! Not great for business.
A 301 redirect tells search engines, “This page has permanently moved here.” Without them, Google sees your new pages as brand new content and your old pages as dead links. That means lost rankings, lost link equity, and a whole lot of 404 errors.
Here’s how to approach it:
Map every old URL to its new URL in a spreadsheet. Prioritise your highest-traffic pages and pages with strong backlink profiles. Don’t redirect everything to the homepage. That’s lazy, and Google knows it. Test your redirects in a staging environment before going live.
PRO TIP: Let’s say you’ve got 500 pages on your current site. If even 20% of those are generating organic traffic, that’s 100 pages where broken redirects could cost you real business. Map them properly. No shortcuts.
4. Set Up a Staging Environment
Never migrate straight to your live site. Set up a staging environment where you can build, test, and troubleshoot your new site without affecting your live performance.
Make sure your staging site is blocked from search engines (via robots.txt or password protection). The last thing you need is Google indexing a half-finished version of your new site.
During Migration: Execute the Plan
5. Implement Your Redirects
With your redirect map ready, it’s time to implement. Depending on your platform and server, this might be done via .htaccess files, server-level redirects, or a WordPress plugin like Redirection or Rank Math – As an agency we use Rankmath Pro, we find this most effective for redirects along with additional SEO benefits for scalable implementations.
Double-check every redirect. A single wrong redirect can create chains, loops, or send users to the wrong pages. Test, test, test.
6. Check Your On-Page SEO
During the migration, make sure your on-page SEO elements have carried across:
Title tags and meta descriptions. Header tags (H1, H2, H3 structure). Image alt text. Internal links (update any that point to old URLs). Canonical tags pointing to the correct new URLs. Schema markup and structured data.
It’s easy to lose these in a redesign, especially if your new site has a different content structure. Don’t assume your development team has handled this. Check it yourself.
7. Update Your XML Sitemap
Generate a new XML sitemap reflecting your updated site structure and submit it to Google Search Console. This helps search engines crawl and index your new pages faster.
While you’re at it, review your robots.txt file. Make sure it’s not accidentally blocking important pages on the new site.
Post-Migration: Monitor and Fix
The migration isn’t done when the new site goes live. In fact, this is where the real work starts.
8. Run a Full Post-Migration Crawl
Crawl your new site immediately after launch. Compare it against your pre-migration crawl data. You’re looking for:
Any pages returning 404 errors. Redirect issues (chains, loops, incorrect destinations). Missing or duplicate meta data. Broken internal or external links. Changes in page count (did pages go missing?).
EXPERT TIP: Don’t just check once and walk away. Crawl again at 48 hours, one week, and one month post-migration. Issues can surface over time as Google re-crawls your site.
9. Monitor Your SEO Performance
Keep a close eye on Google Search Console in the weeks following migration. Watch for:
Indexing issues or coverage errors. Drops in impressions or clicks for key pages. Crawl errors flagged by Google. Any manual actions or security issues.
It’s normal to see a small dip in performance right after a site migration. Google needs time to process the changes. But if you’re seeing significant drops that don’t recover within 2 to 4 weeks… something’s gone wrong with your redirects, indexing, or site structure.
10. Test Everything a Real User Would
This one gets overlooked more than it should. Walk through your new site like a customer would. Test your forms, check your checkout flow, click through your navigation, test on mobile, check page load speeds.
A technically perfect migration means nothing if the site doesn’t actually work for the people using it.
PRO TIP: Use Google PageSpeed Insights and run a Lighthouse audit on your key pages post-migration. Performance issues on the new site (slow load times, layout shifts) can hurt rankings just as much as broken redirects.
11. Update External Links and Listings
If your domain or URL structure has changed, don’t forget the links you don’t control. Update your Google Business Profile, social media profiles, directory listings, and reach out to sites linking to your old URLs where possible.
Yes, your redirects will catch most of this traffic. But direct links to the new URLs are always stronger for SEO than relying on redirects long-term.
The Bottom Line
A website migration doesn’t have to be a disaster. With proper planning, a thorough redirect strategy, and careful post-migration monitoring, you can move your site to a new domain, platform, or hosting provider without losing the SEO performance you’ve built.
The biggest mistakes we see? Rushed timelines, incomplete redirect maps, and no post-migration monitoring plan. Don’t be that business.
If you’re planning a site migration and want expert eyes on the strategy, we’re here to help. At Digital Nomads HQ, we’ve managed migrations across every platform and industry. We know where things go wrong, and more importantly, how to make sure they don’t.
Let’s talk.